

Mastering Window Flange Installation: Avoid These Common Mistakes
Ensure a Watertight and Durable Seal for Your Home's Windows
Installing new windows is a significant investment. A small oversight leads to costly water damage and energy loss.
The window flange, a simple-looking part, is a key component. It creates a strong barrier against the elements.
Learn expert techniques and common mistakes to avoid. Ensure your windows provide lasting protection and performance.
Proper window flange installation protects your home. It stops moisture intrusion, air leaks, and structural damage. Many homeowners and some professionals miss important details. This causes expensive, long-term problems. Knowing which mistakes to avoid during this process is vital for a good, lasting result. This guide explains the key methods. It focuses on areas like fastener choice, top flange technique, and how to install specific brands like Marvin windows.
Table of Contents
- Understanding Window Flanges: Why Proper Installation Matters
- Nailing vs. Screwing Window Flanges: Debunking Myths and Best Practices
- The Critical Top Flange: Sealing Against the Elements
- Marvin Windows Flange Installation: Specific Considerations
- What This Means For You: Ensuring a Durable and Watertight Seal
- Risks, Trade-Offs, and Blind Spots in Flange Installation
- Key Takeaways
- Main Points
- Frequently Asked Questions
Understanding Window Flanges: Why Proper Installation Matters
The window flange, also called a nailing fin, is the perimeter frame of your window. It extends outward. It attaches securely and seals to the wall sheathing. It is the primary barrier against water penetration. It directs moisture away from the wall cavity. A correctly installed flange makes your window system watertight and energy-efficient. Neglecting proper technique leads to issues. These range from minor drafts to severe structural rot and mold growth. Many common installation mistakes begin with a basic misunderstanding of the flange's role and how it works with flashing and house wrap.
Understand that the flange is one part of a multi-layered defense system. It works with flashing tape, house wrap, and sealant. This creates a complete weather barrier. Each layer must overlap correctly. Follow a "shingle style" approach. This helps gravity shed water downward and away from your home. Any breach in this system compromises the entire defense. Incorrect flange fastening or sealing often cause this.
Nailing vs. Screwing Window Flanges: Debunking Myths and Best Practices
Many people debate whether to use nails or screws for window flange installation. The choice is not always simple. It depends on the window manufacturer's recommendations, the framing material, and local building codes. Both fasteners work. Know which mistakes to avoid when you choose and apply them.
When to Nail:
- Speed and Efficiency: Nails, mainly those applied with a nail gun, provide faster installation. It helps on large projects.
- Traditional Method: Nailing is a traditional method. It works when done correctly.
- Material Compatibility: Best for wood framing. Nails provide good shear strength. Screws strip more easily in some wood types.
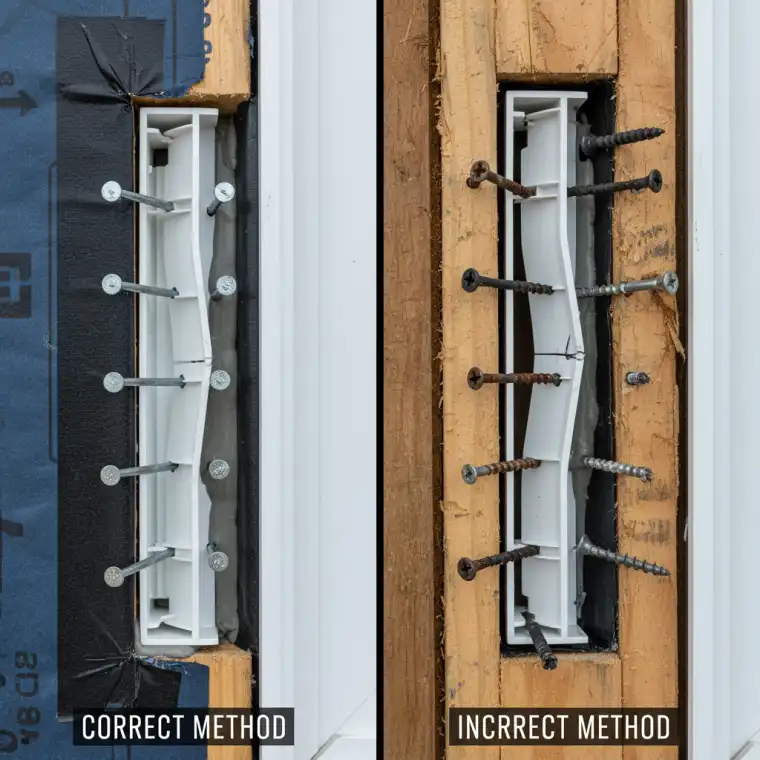
Common Nailing Mistakes to Avoid:
- Over-Nailing: Driving nails too deep deforms the flange. It creates stress points or compromises the window frame. Always aim for flush.
- Under-Nailing: Nails not driven deep enough do not secure the window properly. They interfere with siding installation.
- Incorrect Nail Type: Use nails too short, too thin, or without corrosion resistance for exterior applications. Always use galvanized or stainless steel ring-shank nails.
- Improper Spacing: Not following manufacturer specifications for nail spacing leads to inadequate structural support.
When to Screw:
- Superior Holding Power: Screws offer better pull-out resistance. This is good for high-wind zones or with heavier windows.
- Adjustability: Screws allow minor adjustments during installation. This helps you ensure the window is perfectly plumb, level, and square.
- Material Compatibility: Ideal for metal studs or hard wood types. Nails bend in these materials.
Common Screwing Mistakes to Avoid:
- Over-Tightening: This is the most common mistake. Over-tightening screws warps the window frame. It makes the sashes difficult to operate and compromises the seal. Hand-tighten the final turns.
- Incorrect Screw Type: Use screws not approved for exterior use. They lack corrosion resistance. Screws too long hit plumbing or electrical. Use self-tapping, corrosion-resistant screws suitable for the application.
- Stripping the Fastener: Using an impact driver on too high a setting or applying excessive force strips the screw head or the receiving material.
- Ignoring Manufacturer Guidelines: Marvin windows, for example, have specific screw types and lengths recommended. Deviating from these voids warranties.
Regardless of your chosen fastener, ensure the window remains square, plumb, and level throughout the installation. Regularly check these measurements as you fasten to prevent bowing or racking of the frame. Ignoring this step leads to operational problems and compromises the window's energy efficiency. To learn more about the overall financial aspects of this investment, you find our guide on decoding your window replacement cost helpful.
The Critical Top Flange: Sealing Against the Elements
All flanges are important, but the top flange of a window is especially important for preventing water intrusion. Any water breaching the exterior cladding runs downwards due to gravity. This makes the area above the window vulnerable. Improper sealing or fastening of the top flange is a main cause of leaks.
Common Top Flange Mistakes to Avoid:
- Inadequate Flashing Overlap: The flashing tape or house wrap above the window must always overlap the top flange in a shingle-style manner. Failing to do so allows water to get behind the flange.
- Improper Sill Flashing: An incorrectly sloped or sealed sill flashing below the window causes water to pool and wick upwards. This later impacts the bottom of the top flange assembly. Ensure a proper sloped sill pan and continuous sealant bead.
- Missing Head Flashing: Many building codes and best practices call for a separate piece of head flashing (metal or flexible membrane). Install it over the top of the window frame and flange. It extends out over the exterior trim or siding. This serves as an additional drip edge.
- Sealing the Top Flange Entirely: This is a critical mistake. People often misunderstand this mistake. The top flange usually does NOT seal completely with caulk or sealant along its upper edge. The sides and bottom usually seal to the rough opening with sealant before setting the window. The top usually remains unsealed *at the immediate connection of the flange and the house wrap/sheathing*. This allows any incidental moisture behind the exterior cladding to escape. It prevents moisture from trapping inside the wall cavity, which leads to rot. The primary water barrier above the window is the correctly layered flashing and house wrap, not a bead of caulk on top of the flange.
- Insufficient Fastening: The top flange still needs secure fastening. This prevents bowing or separation, mainly in windy conditions. Follow manufacturer guidelines for fastener placement and spacing.
Picture the top flange and its flashing. Each layer sheds water over the layer below it. Any disruption to this flow, like back-pitching or an incomplete seal, invites water into places it should not be. This leads to big problems later.
Marvin Windows Flange Installation: Specific Considerations
Marvin Windows are quality windows. They have specific installation requirements. These ensure optimal performance and warranty validity. General rules for window flange installation apply. However, consider specific details when working with Marvin products. Ignoring these leads to voided warranties and compromised window integrity.
Key Considerations for Marvin Windows:
- Manufacturer's Instructions are Paramount: Marvin provides detailed installation guides for each product line. These manuals are not suggestions. They are explicit instructions. You must follow them precisely. They specify fastener types, spacing, flashing methods, and sealant recommendations specific to their windows.
- Shimming and Leveling: Marvin emphasizes precise shimming. This ensures the frame is perfectly square, plumb, and level. This allows sashes to operate smoothly. Seals maintain integrity. Incorrect shimming puts undue stress on the frame and flanges.
- Integrated Flashing Systems: Many Marvin windows work well with specific flashing systems. Understanding and using these systems as recommended is crucial for their performance. This often involves specific tapes and sealants. These materials work with the window's components.
- Sealant Compatibility: Always use sealants specified or approved by Marvin. Incompatible sealants degrade the window's components, mainly vinyl or aluminum cladding. This leads to premature failure of the weather barrier.
- Fastener Type and Spacing: Marvin's guides specify whether nails or screws are preferred. They also give the exact spacing required for the nailing fin. Deviating from these affects the structural integrity of the installation and the warranty. For instance, some Marvin products recommend stainless steel screws in coastal environments.
Failure to follow Marvin's specific instructions is a common mistake. It leads to costly callbacks, warranty denials, and a poorly performing window. Download and review the latest installation manual for the exact Marvin product you are installing. When considering the financial impact of such specific installations, our guide on your definitive window replacement cost helps you budget for premium window installations.
What This Means For You: Ensuring a Durable and Watertight Seal
For homeowners, understanding the details of window flange installation gives you peace of mind and long-term savings. When you know which mistakes to avoid, you ask the right questions of your installers. You also do a careful DIY installation. A correctly installed window prevents expensive water damage. It protects your home's structure. It keeps energy efficiency high. This controls your utility bills.
For professional installers, this knowledge supports good methods. It builds reputation and reduces costly callbacks. Following manufacturer guidelines and industry standards for flange installation means more than compliance. It delivers a superior product and service. It means consistently achieving a watertight seal. It extends window life and ensures customer satisfaction.
A proper flange installation contributes to a home's overall health and value. It is a foundational step. When executed flawlessly, it provides a strong defense against the elements. It maintains interior comfort and preserves your windows' aesthetic appeal for decades.
Risks, Trade-Offs, and Blind Spots in Flange Installation
Even with the best intentions, several risks and trade-offs arise during window flange installation. This causes common blind spots. Recognizing these potential problems is crucial for preventing issues.
- Rushing the Process: Time pressure leads to shortcuts. Examples include poor flashing preparation, skipped sealant beads, or rushed fastening. The trade-off for speed is often a compromised long-term performance.
- Over-Reliance on Sealant: Sealant is important. It is not a substitute for proper mechanical fastening and flashing. People often believe excessive caulk compensates for poor shingle-lapping or inadequate fastener placement. Sealants degrade over time. The physical barriers of the flange and flashing are the primary defense.
- Ignoring Substrate Condition: Installing a window flange onto rotten, uneven, or improperly prepared sheathing or framing causes problems. The "new" window does not perform optimally if its foundation is compromised.
- Incompatible Materials: Using incompatible flashing tapes, sealants, or fasteners leads to chemical reactions, adhesion failure, or premature degradation. Always check for material compatibility.
- Lack of Training/Experience: Flange installation requires skill and attention to detail. Inexperienced installers unknowingly make critical errors. These errors only become apparent months or years later. They often appear as leaks.
- Climate-Specific Considerations: What works in a dry climate fails badly in a humid, rainy, or high-wind environment. Local building codes and best practices account for these variations. Ignoring them is a significant blind spot. For instance, rain screen principles are vital in some regions.
- Not Testing Operation: After installation, failing to test the window's operation (opening, closing, locking) thoroughly overlooks subtle warping or bowing caused by over-fastening or improper shimming.
These blind spots show a successful installation goes beyond simply attaching the window. It requires a complete understanding of building science, material compatibility, and diligent execution at every step.
Key Takeaways
- Proper window flange installation is vital for preventing water damage, air leaks, and ensuring energy efficiency.
- Choose between nailing and screwing based on manufacturer guidelines, framing material, and local codes. Avoid common mistakes like over-tightening or incorrect fastener types.
- The top flange requires specific attention. Use crucial flashing overlaps and the deliberate decision to usually *not* seal its upper edge to allow for moisture escape.
- Adhere strictly to manufacturer-specific instructions, mainly for brands like Marvin windows, to maintain warranty validity and optimal performance.
- Regularly check the window for plumb, level, and square throughout the fastening process to prevent frame distortion.
- Understand the flange is part of a multi-layered weather-resistant barrier. It works with flashing, house wrap, and sealants.
- Avoid rushing, over-reliance on caulk, ignoring substrate condition, and using incompatible materials to prevent future problems.
- Prioritize material compatibility and climate-specific considerations for a durable and watertight seal.
Main Points
Mastering window flange installation is a detailed process. It demands precision and adherence to best practices. The decision between nailing and screwing must align with manufacturer specifications and project needs. Avoid common errors like over-fastening. Importantly, the top flange requires careful attention to flashing and a clear understanding of sealing. This ensures proper water shedding and moisture escape. For specific brands like Marvin windows, following their detailed installation guides is essential for performance and warranty. By understanding and avoiding these critical mistakes, you ensure your windows are installed correctly. They provide lasting protection, energy efficiency, and operational integrity for your home.
Frequently Asked Questions
Should you nail or screw window flanges?
The choice between nailing and screwing window flanges depends on the window manufacturer's recommendations, the type of framing (wood vs. metal), and local building codes. Nails are often faster for wood framing. Screws offer superior holding power and adjustability, mainly for heavier windows or in high-wind zones. Prioritize manufacturer instructions to avoid voiding warranties.
How do you properly install the top flange of a window?
To properly install the top flange, ensure the house wrap and flashing tape above the window overlap the top flange in a shingle-style manner. This directs water downwards. A head flashing is often installed over the top of the window and flange as an additional drip edge. Critically, the top edge of the flange itself is usually NOT sealed with caulk to the house wrap/sheathing. This allows incidental moisture to escape. It prevents moisture from trapping in the wall cavity. The sides and bottom should be sealed to the rough opening.
What are common mistakes to avoid when installing Marvin window flanges?
When installing Marvin window flanges, the most common mistake is failing to strictly follow their specific installation manuals. Marvin provides detailed guidelines for fastener types, spacing, shimming, flashing integration, and sealant compatibility. Deviating from these leads to compromised performance, water intrusion, and potentially voids the manufacturer's warranty. Always consult the product-specific manual.
What happens if a window flange is not installed correctly?
If a window flange is not installed correctly, it leads to severe issues such as water leaks. This causes wood rot, mold growth, and damage to interior finishes. Improper installation also results in air leaks. This reduces your home's energy efficiency and increases utility bills. The window does not operate smoothly. Its structural integrity compromises. This voids manufacturer warranties.